Planter boxes are a great way to bring greenery to balconies, rooftops, courtyards, and other urban spaces, but without proper waterproofing, they can quickly become a source of leaks, mould, and structural damage. Whether your planter is made from concrete, brick, timber, or masonry, installing a high-performance membrane waterproofing system is critical to prevent water ingress and ensure durability.
In this blog, we’ll walk you through why planter box waterproofing is essential, how waterproof membranes work, and the step-by-step process for ensuring a watertight, long-lasting result.
What Is Planter Box Waterproofing?
Planter box waterproofing is the process of creating a watertight seal within a planter to stop moisture from penetrating surrounding walls or floors. This is especially important when planter boxes are located above living spaces, such as apartments or basements.
The most effective solution is a membrane waterproofing system, sometimes referred to as a “blanket system.” It involves applying multiple layers of waterproof membrane to create a seamless, protective barrier inside the planter box.
Why Waterproof Membranes Are Essential for Planter Boxes
Planter boxes are exposed to constant moisture from soil, irrigation, and weather conditions. Without a proper membrane waterproofing system, planter boxes can:
-
-
- Leak into apartments or basements
- Cause structural rot, concrete cancer, and mould
- Lead to expensive repairs or full rebuilds
-
Installing a professional-grade waterproof membrane protects the planter structure, prevents leaks, and extends the lifespan of both the planter and surrounding areas.
Step-by-Step: How to Waterproof a Planter Box:

1. Site Consultation and Assessment
We begin with a site assessment to evaluate the planter box condition, diagnose existing leaks or damage, and determine the best membrane system based on the surface type and location. This helps us recommend a tailored solution.

2. Cleaning and Surface Preparation
The planter box must be completely cleaned before membrane installation, to remove all debris, grime, loose coatings, and failed membrane sections. Grind back delaminated areas for a smooth, sound surface. Apply HydrEpoxy primer to neutralise and prepare the substrate for membrane adhesion

3. Layering
For effective waterproofing, the membrane must be applied in multiple layers. Each layer is built up to the required thickness.
We follow the supplier’s recommendations for layer overlaps, ensuring a seamless and watertight barrierwithout weak points.

4. Barrier
Once the build-up layers are complete, a final topcoat is applied. This topcoat often UV-stable seals the system and provides long-term resistance to UV degradation, plant root intrusion, and moisture infiltration.
After curing, the planter is ready for backfilling with appropriate drainage layers and soil.
Technical Notes on Membrane Systems:
Waterproof Membrane – Your First Line of Defence
The membrane blocks moisture from reaching the planter structure. Over time, exposure to weather and plant materials can degrade the membrane. That’s why complete system maintenance or upgrades are necessary every few years.
Thickness Matters – Don’t Underestimate it
To ensure a thorough seal, the membrane should be applied at a thickness ranging from 300mm to 700mm. This ensures that the membrane covers all surfaces inside the planter box, protecting it from water seepage and extending its lifespan. If the membrane is too thin or improperly applied, it will not provide adequate protection, and water can still leak through. With larger planters, the thicker the membrane, the better the protection.
Seamless Coverage – No Shortcuts
When applying the membrane, it’s critical to overlap the edges by the required suppliers guidelines. This overlap ensures that there are no weak spots where water could potentially seep in. A continuous, seamless seal is necessary to maintain the planter box’s integrity. Patchwork fixes might cover up a crack temporarily, but they don’t address the fact that the whole membrane could be at risk of failure, leading to further damage down the line.
Membrane Degradation Over Time – Understand the Lifecycle
Even properly applied membranes will deteriorate over time. Over the years, the membrane will “render”—a term meaning that it will gradually degrade due to exposure to the sun’s UV rays, moisture, and temperature fluctuations. The membrane’s protective qualities will weaken, making it less effective at keeping water out.
Signs Your Planter Box Needs Waterproofing
Visible Cracks
Cracked slabs or damaged areas in the planter box are clear signs that the waterproof membrane is failing.
Damp or stained ceilings below rooftop planters
Damp or stained ceilings below rooftop planters are a sign of water ingress.
Water Ingress
Dampness in surrounding areas or water seeping into the structure suggests the membrane is no longer providing a watertight seal.
Peeling Coatings
If the coating is peeling or deteriorating, it’s time to reapply the membrane for continued protection.
Efflorescence or mould
Efflorescence or mould on nearby surfaces
Example Project: Planter Box with Failed Membrane System
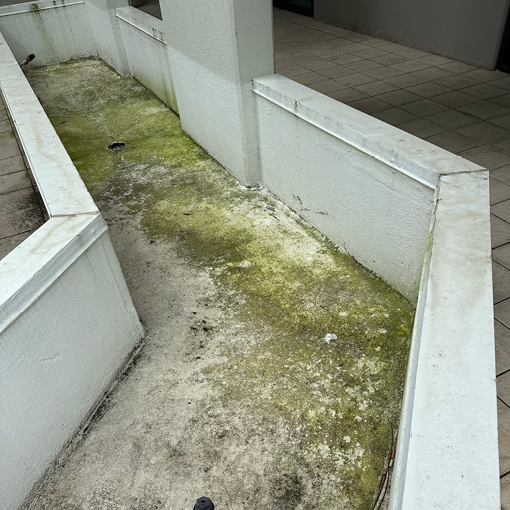
Signs Your Planter Box Needs Waterproofing
Water damage is often the first visible sign that your planter box needs attention. Cracked slabs, peeling coatings, and dampness in surrounding areas are all indicators that the waterproofing system is failing. Here’s why it’s essential to address these issues immediately:
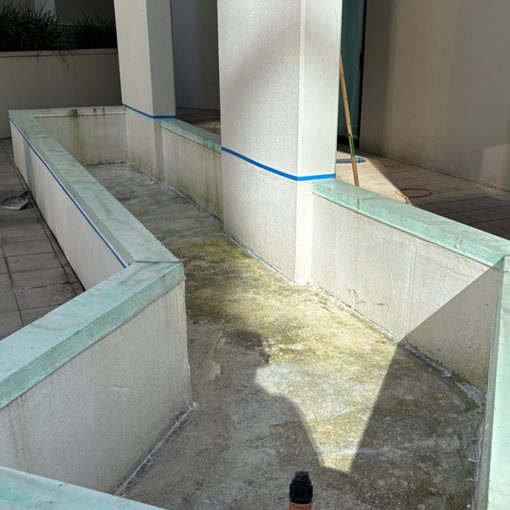
Cleaning and Surface Preparation
The first step in the waterproofing process is to thoroughly clean the internal and external surfaces of the planter box. We remove any debris, grime, and loose or failed membrane sections. Any delaminated membrane is ground back to ensure a clean, smooth surface.
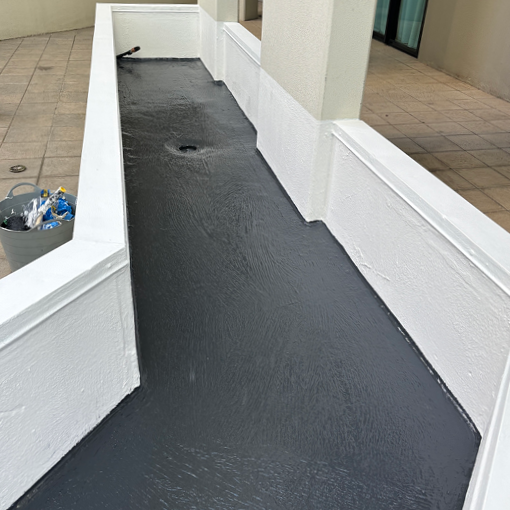
Membrane Application
Before applying the membrane, we use a high-quality primer such as HydrEpoxy to neutralise the surface and enhance the adhesion of the membrane.
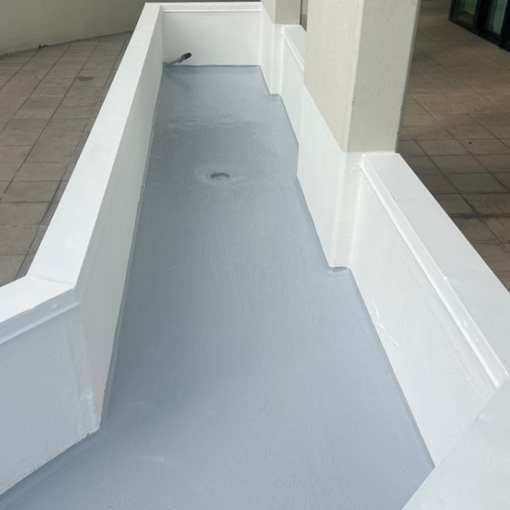
Topcoat Layer
Once the layers are complete, the final coat of Bayset UV Stable Polyurethane Membrane is applied to seal the surface fully. This membrane is designed to resist the harsh effects of UV rays, moisture, and temperature changes, ensuring the planter box remains waterproof for years to come.
Why Choose Stop & Seal for Planter Box Waterproofing?
Waterproofing your planter box with a high-quality membrane system is essential to ensure its longevity and prevent water damage. By following a systematic approach, from consultation and surface preparation to the application of multiple membrane layers, you can keep your planter box in top condition for years to come. Don’t rely on temporary fixes—opt for a complete membrane system revamp to guarantee long-term protection.
If you notice any signs of water damage or degradation in your planter box, get in touch with our expert team for a tailored solution. Let us help you protect your investment with our professional waterproofing services.
Waterproofing Service Areas:
Australia-Wide, Key Areas include Queensland, Victoria & New South Wales

We provide waterproofing services Australia-wide, with our head office based on the Gold Coast. Our expert waterproofing solutions cover :
Queensland, including key service areas in Brisbane such as but not limited to Brisbane CBD, Fortitude Valley, Spring Hill, and West End, as well as Gold Coast areas like Southport, Surfers Paradise, Burleigh Heads, Coomera, Robina, and Tweed Heads. From injection waterproofing to membrane waterproofing, we offer a range of reliable solutions for both residential and commercial properties.
Victoria, we provide professional waterproofing services in Melbourne and surrounding areas, including but not limited to Melbourne CBD, Southbank, St Kilda, and Docklands. We also service other parts of Victoria, offering membrane waterproofing and other high-quality waterproofing solutions across regions such as Geelong, Werribee, Ballarat, and beyond. Our injection waterproofing methods ensure long-lasting protection for your property.
New South Wales, Our NSW Metro franchise is available to assist with waterproofing needs NSW Metro. From injection waterproofing to membrane waterproofing, we have the expertise to solve a wide range of waterproofing problems. You can reach our NSW Metro franchise directly at [email protected] or 0418 830 860.
Need Help With Leaking Planter Box
If you’re noticing water ingress, damp patches, peeling paint, or efflorescence around your planter box, don’t wait for the damage to spread. Our team specialises in planter box waterproofing, repairs, and full membrane system replacements.
Book a free site inspection today and get expert advice tailored to your property.